Expert challah tips and tricks. Join Challah Bytes today!

Tag Archives: food recipes

Cranberry Chicken

This one is a family favorite. My mother got it years ago, shortly before I got married, from I-don’t-know-where and she liked it so much that she taught it to the caterer of my wedding and had him make it for the meal!
Since then I save it especially for this time of year. It’s simple but very special. This recipe makes enough for two whole chickens.

Ingredients

2 chickens, cut into eighths, skinned
1 cup flour
1 Tablespoon onion powder
1 Tablespoon garlic powder
1 teaspoon black pepper
1 large onion, sliced thin

Sauce

1 can cranberry sauce
1 can whole berry cranberry sauce
1 cup real French dressing (recipe to follow)
1 can of the cranberry cans of water

French Dressing

In a hand blender or immersion blender jar, blend together until smooth the following:
1 small onion
½ cup canola oil
1/2 cup vinegar
1/3 cup sugar
1 teaspoon salt
2 teaspoons paprika
2-3 Tablespoons ketchup
1 Tablespoon lemon juice

Method

Preheat the oven to 350°F / 180°C. Spray two 9×13 baking pans or one large pan with baking spray.

Place the flour with the spices in a plastic bag. Put each piece of chicken into the bag and shake to coat it evenly. Lay the coated chicken pieces in the pan.

Put all the sauce ingredients into a large bowl. Mash them together with a potato masher or a fork to break up the lumps of cranberry sauce somewhat. You can use a bought jar of French dressing but since I didn’t have any, I made the dressing myself in a hand blender jar. (There are also no preservatives in your dressing this way.) Pour the sauce over the chicken and top it with the onion slices.

Bake the chicken uncovered for 75 minutes on bake, not convection, not broil. Check the chicken when it’s been in the oven about half the time. If it looks like it may dry out to you, baste it and then cover it for the rest of the baking time.

Another great Rosh Hashana (or any time, for that matter) quickie idea for a side dish to do with this chicken is to add a bag of frozen baby carrots to the pan before laying the chicken pieces down. When it’s done cooking, you will have a delicious chicken plus a carrot side dish to serve it with.

Pomegranate Glazed Apple Strudel Squares

You don’t need the mixer for this recipe, it is easily hand done.and this smells amazing while baking!

Ingredients

4 cups flour
1 ½ cups trans fat free or reduced margarine
1 ½ cups sugar
2 eggs
7 medium sized any kind apples
1 Tablespoon lemon juice
½ cup sugar
1 teaspoon cinnamon

Pomegranate Glaze
1 ½ cups powdered (icing or confectioners) sugar (don’t use regular white sugar it will not work!)
2 ½ Tablespoon oil
1/8 teaspoon lemon juice
4-5 Tablespoons hot pomegranate juice or syrup (you can use a pomegranate drink such as “Spring” brand to save some money)

Method

Preheat the oven to 350°F / 180°C.

In a large bowl, combine the flour and trans fat free margarine. Cut it together until it is crumbly. Add the sugar and mix a bit again. Check the eggs and beat them slightly with a fork in the glass they’re in. Add to the flour mix and combine all until you have a chunky, dry looking crumble mixture. Take off almost ¾ of this mixture and pat it down firmly into a large pan, about 11×14 in or a 16×10 inches. (It’s about one and a half times the size of an ordinary 9×13 pan.)

For the apples, whichever kind you choose will give this recipe a different flavor each time you do it. Myself, I just use up whatever old apples I have sitting in the fridge, so mine was made with a combo of all three colors of apples. It came out delicious.

Peel the apples and slice them/ pare them by hand into a large bowl. Sprinkle the lemon juice over them. Combine the ½ cup sugar and the cinnamon together over the apples and toss the whole mixture so it is coated evenly. Place this apple mixture all over the top of the crumbs in your pan. After it’s even, crumble over it the rest of the crumbs mixture. You may want to crumble the remaining crumbs a bit more by hand before sprinkling all over so you will be left with less lumpy pieces after it bakes on top of it.

Bake for 45 minutes until it is slightly golden all over and a drop darker by the edges. Remove from the oven and let it cool. After it’s cooled, cut it into squares and set aside.

Pomegranate Glaze

Place the pomegranate juice / syrup into a glass and heat it in the microwave for 40 seconds on high. Alternately, place the glass it’s in into a bowl of hot water to warm it up. It does need to be hot in order to turn into a good glaze. Put the powdered sugar in a plastic bowl, add in the oil and lemon juice. Add in the first 3 T. of hot pomegranate liquid. Start to mix it with a spoon. It should begin to thicken almost immediately. If it’s too thick, add more hot liquid by small, very small, increments until it is thick enough to drip but is not runny. If it’s too thin, add small amounts more of powdered sugar and keep mixing by hand until it is a nice thick, but not too firm consistency. Take your spoon and drizzle it all over in thin lines on top of your by-now-cooled-down apple strudel squares. There’s no food coloring in this picture, this is really how it comes out when using pomegranate liquid. Enjoy! This can be frozen in the pan until the day of use. Just remove it from the freezer about 3 hours before you need it, then present your squares on a nice platter or in cupcake holders, and serve.

Incredible Honey Cookies

Here’s a GREAT make-ahead Rosh Hashanah recipe that I made last year and taped up on my notice board then, specifically so that I wouldn’t forget to share it with all of you this year…

A very dear and special lady, Rebbetzin Sarah Meisels, gave me this recipe. She told me they are so good that even if your family doesn’t like honey cookies, these will not go uneaten, and boy, was she ever right. I made a huge batch of them last year and then had to hide them in the freezer so they wouldn’t be completely finished before I needed them. And this is from a baker (me!) who always shied away from honey cookies. I know this is a very big recipe — but, since it’s Erev Yom Tov now and many of our readers have large families to prepare for, I decided to leave the Rebbetzin’s amounts as they are. This makes over 100 cookies, but only if you don’t allow your fan club to snatch them off the trays as they are coming out of the oven…

Ingredients

1½ cups margarine (300 grams)
2 cups sugar (450 grams)
6 eggs
1 cup honey
7 cups flour (1 full kilo of flour)
1-2 teaspoons cinnamon
1¼ teaspoons baking soda
1 teaspoon juice
¼teaspoon ground cloves (optional)

Method

Cream the margarine and the sugar. Add in the eggs. Mix again. Add in everything else. Mix until you have a nice soft dough and then turn off the mixer. It will be somewhat sticky — this is normal. Cover and place the cookie dough in the fridge to firm up for about 1–2 hours. If you forget to take it out until the next day, that’s okay too.

Preheat the oven to 350°F/180°C.

Line the baking trays with parchment paper. Form small balls of cookie dough, roll each ball in a bit of flour and place them on parchment paper lined cookie trays. Press down each cookie very slightly with the tips of your fingers. Don’t press too hard! Bake the cookies until they are light golden brown, about 10–12 minutes. DO NOT bake them more than 15 minutes or they will be rock hard! When they are slightly crinkled and golden brown, they are done. Remove from the oven immediately. Let them sit on the tray for a few more minutes before you remove them to a platter to cool completely. I suggest making these on a morning when kids and hubbies are not home so that you will have something to put into the freezer after you are done!

Healthy and Refreshing Milkshakes

It’s that time of year again when it gets very hot outside and everyone constantly wants something refreshing to sip on. Buying milkshakes or ice coffee in the stores can be very pricey, especially if you are treating a large crowd of your children or grandchildren. Besides, the amount of sugar added in many cases really racks up the calories. Here’s another question I get from readers:

I want to make some kind of milkshakes for my kids but haven’t figured out how to make them that great consistency like the store does. Is there another way to do this, besides having to buy large tubs of ice cream and adding them to my blender with milk?
Do you also have a suggestion for making these healthier, if possible?

Over ten years ago I came up with this “milkshake” idea, mostly because here in Israel, the children are sent home from school between 1-2 pm, the hottest time of day. Couple that with the fact that they have to walk home most often, and are shlepping heavy backpacks on their backs and you get tired, hot, cranky and very thirsty kids coming in your house midday. Mine, especially, were in no mood for a heavy meal then and really appreciated something cold and refreshing.

I never use ice cream. It is expensive, doesn’t work that well for a thick shake, and adds a lot of sugar. I simply use frozen, ripe bananas.

When bananas are cheap, I buy a whole lot of them. I let them ripen to the point that they are delicious and soft, but not totally browned. Then I peel every one of them and freeze them in cheap bags, two at a time. If you freeze them in their peels, it is very difficult to get the peel off easily later on, which is why I freeze them unpeeled. Just one word of caution: bananas have all sorts of things clinging to their outside peels so watch your fingers as you peel them. Check them over briefly to make sure that your unpeeled bananas did not inadvertently become dirty in the process. After that, all I do is place them, bagged and tied, all in one of my freezer drawers, ready for use.

To make my shakes, I then put 2-3 frozen bananas in my blender and add 2 cups of milk. I let it sit for five minutes to soften the bananas somewhat, but not all the way. I cut through the chunks with a knife. If it cuts easily, it can then be blended. Cover the blender, turn it on high and poof—a creamy, delicious, and healthy shake is ready in seconds.

I even keep a steady stash of straws always on hand. Nothing like a tall glass of ‘milkshake’ with a straw to enjoy it with!

This also tends to be very filling and everyone, no matter their age, enjoys it. You can change the colors and tastes by adding in other pieces of softened, ripe fruit. Mangoes, strawberries, blueberries. You only need a small amount of the second fruit for flavor and color, the thickness comes from the bananas.

To make the shake thicker, add less milk per banana. To make it thinner, add more milk. You do not need to add any sugar at all nor any vanilla pudding powder to thicken this nor to flavor it. The sweetness of the ripened bananas is more than enough to make it sweet enough for all! And this milk version has the added plus of calcium.

I have a child who is allergic to milk. What else do you suggest?

You can certainly substitute almond milk, which is also very tasty. Or you can make it entirely from fruit juice and a bit of water. Add in the bananas and maybe 1/4 cup frozen blueberries. Pour 2 cups of orange juice and blend as above. It’s delicious.

I find this is a great way to enjoy a milkshake any time of day, no matter how many people are around and it really saves money too.

Enjoy your shakes!

Salmon Burgers

These go so well with typical hamburger buns and make a great weekday, easy meal.
Look how delicious and inviting they are–the day we shot these photos, everyone wanted to eat them just as soon as we finished shooting the pics!

Ingredients

1 – 14.75 oz / about 420 grams can of salmon
1 large onion, diced
½ cup breadcrumbs or matzo meal
2 eggs
¼ cup ketchup
¼ cup mustard
½ tsp. pepper, optional

Method

Sautee the onion in a bit of oil. I use either canola or olive oil. Flake the salmon into a bowl, and if you don’t like the taste or feel of the little bones, then remove those as well. If you do like them, they provide some extra calcium. Add in all else, mix well, and just form into generous sized patties. Pics # 2553, 2554, 2555. As you can see here, this one can made quite a lot of burgers, and with some good buns, fresh lettuce, tomatoes, onion rings and even a few pickles, this is a really nice meal!

Pomegranate Flavored Glaze

1 cup powdered sugar
2 tablespoons oil
2-4 tablespoons juice

You don’t need to buy expensive real pomegranate juice. I just used one of those Spring boxes of pomegranate ‘juice’ drink. It works fine.

Mix these ingredients together with a spoon, starting with only 2 tablespoons of the juice, until they are smooth. If it is too dry, add in bits more juice. If it is too thin and therefore sinks into the cake too quickly, add in more powdered sugar to thicken it. Once it’s a nice consistency, drizzle it with the help of a spoon all over your cooled cake, and enjoy!

Apple Beet Cake
Great idea just in time for Rosh Hashana!

Here’s a sweet, new idea on how to creatively incorporate some of our ‘regular’ Rosh Hashana foods in newer ways, beets, apples and a healthy sweet cake!

This freezes great and with all the beets, apples and whole wheat it is a healthier alternative to regular cake, especially for Kiddush in the morning.
Yields: 30 muffins or 60 mini muffins or 2 – 9 or 10 inch bund cakes

Ingredients

4 eggs
1 & 1/2 cups light brown sugar
3/4 cup canola oil
3/4 cup orange juice
3 cups whole wheat flour
1 & 1/2 teaspoons baking soda
2 teaspoons baking powder
4 small green apples, peeled and shredded
1 teaspoon cinnamon
2 teaspoons additional sugar, or take some sugar off of the amount above
1 teaspoon lemon juice *
2 cups shredded cooked beets
*We don’t usually use tart lemon juice at this time of year; those who want to can leave it out. It is only incorporated into this recipe to keep the apples from turning colors and its taste is not discernible in the final product.

Method

Before beginning, make sure you have already cooked beets on hand, either by boiling them earlier that day and cooling them in the fridge or by baking them, covered at 375°F / 190°C for 45 minutes. They will shred much neater and easier when the cooked beets are cold. Shred them, then measure out 2 cups and keep them ready. If you have extra, either turn them into beet salad or eat them for dinner!
Put all 4 eggs into the mixer, you don’t need to separate them first. Using your wire wisk, beat the eggs for 3 minutes to aerate them somewhat. Then add in the oil, orange juice, flour, baking soda and baking powder in the exact order listed, while the mixer is beating on a low speed. When the batter is smooth, turn off the mixer.

Toss the shredded apples with the cinnamon and the extra bit of sugar and lemon juice. Add them into the batter, together with the shredded beets. Using a spatula, gently turn and mix it into the batter until it is all incorporated. The batter should turn a deep pinkish color.

Preheat the oven to 350°F / 180° C.

Line your muffin trays with muffin liners. If you are doing the bund cake shapes, spray two 9-10 inch bund pans with baking oil spray. Pour batter into the bund pans only until halfway filled, not higher. If you are doing mini muffins, put 2 tablespoons of batter into each cup. For regular muffins, put batter into the cups until it is a little bit more than half way filled with batter.

Slide the cake or muffins into your oven and bake until done.

Bundt cakes should take between 25-30 minutes. Test it to ensure it is done and remove immediately so it will not overbake.

Mini muffins take only about 8-10 minutes to be fully baked.

Regular sized muffins should take between 14-18 minutes.

If you would like a sort of pomegranate or cranberry juice glaze on the top of your bund cake, here’s a nice glaze to try out. However, ONLY add on the glaze after your cake has cooled down completely, or else it will sink and disappear into the cake!

Pomegranate flavored glaze:

1 cup powdered sugar
2 tablespoons oil
2-4 tablespoons juice

You don’t need to buy expensive real pomegranate juice. I just used one of those Spring boxes of pomegranate ‘juice’ drink. It works fine.

Mix these ingredients together with a spoon, starting with only 2 tablespoons of the juice, until they are smooth. If it is too dry, add in bits more juice. If it is too thin and therefore sinks into the cake too quickly, add in more powdered sugar to thicken it. Once it’s a nice consistency, drizzle it with the help of a spoon all over your cooled cake, and enjoy!

Chrein Chicken Salad

Use up your leftover chicken in a unique and tasty way!
Serves 4

Ingredients

2 cups cooked chicken, cut into small chunks
1 hard boiled egg, cut into tiny pieces, optional
2 stalks celery, diced
1 scallion, diced
1 small carrot, peeled and shredded
4-6 tablespoons mayonnaise + 2 tablespoons chrein, mixed together
2 tablespoons olive oil
2 teaspoons lemon juice
1 teaspoon salt
1/4 teaspoon pepper
1 teaspoon garlic powder
1/4 cup crushed almonds, toasted first

Method

In a large, dry skillet over medium heat, toast the almonds for 5-8 minutes until lightly browned. Turn off the heat.
Place the cut chicken pieces, egg, celery, scallion and shredded carrot into a large bowl. In another small bowl, mix together the “chreiyonnaise”, olive oil, lemon juice, salt, pepper, and garlic powder. Pour this over the chicken mixture and mix it together well, by hand.
Add in the toasted almonds and serve in scoops over a piece of lettuce, with a cherry tomato in its center.

And…enjoy!

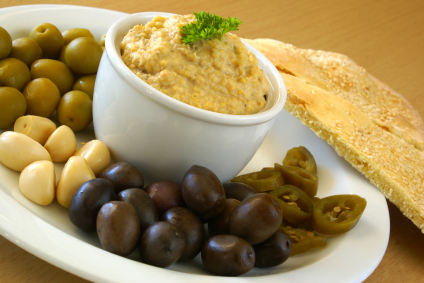
Olive Dip

Dip right into this tasty spread, whether with matzo or even…challah!
Some of you wrote me requesting a dip made from olives. Here it is — and we’d love to know how you enjoy it, or your own dip for challah ideas that you’d like to share with all of us!

SONY DSC
image-1394

Ingredients

Non Dairy (Pareve)

1 cup mayonnaise
2 teaspoons garlic powder OR 1-2 fresh garlic cloves
1/3 cup olives
1/8 teaspoon pepper

Method

Blend and use

Variation:

To make a dairy one, substitue soft white cheese (Gveena levana in Israel)
or cream cheese for the mayonnaise. Healthier too and quite tasty!

Another variation is to do this:

Dice up 2 medium sized onions and saute them in 2 tablespoons of oil until just golden. Add these to the olives in the blender and then blend and use.

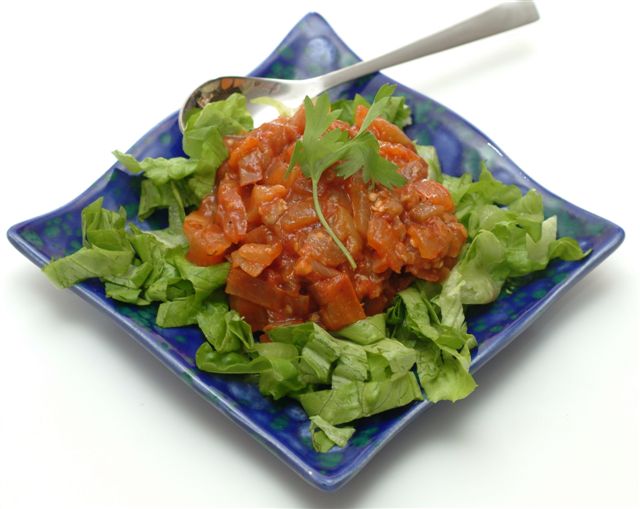
Tangy Eggplant Salad

Such a good recipe, you will use it all year through…as I do!
Serves 6

tangy eggplant salad
image-1289

Ingredients

2 medium onions, diced
3 cloves garlic, diced
1 green pepper, diced
1 large eggplant or 2 small ones, peeled and diced
1/4 cup olive oil
1 & 1/2 tsp. salt
1/4 tsp. pepper
1/2 tsp. oregano
3 T. vinegar
2 T. sugar
3/4 cup tomato sauce

Method

In a large, flat pan that has a lid, add in the onions and garlic, and the
olive oil and start to sautee until it starts to turn a clear, golden color,
about 10 minutes. Add the diced green pepper and cook it another 5 minutes,
stirring occasionally. Add in the diced eggplant and let it cook for another
10 minutes. Add in all the seasonings and the rest of the ingredients. Turn
the flame down to simmer, cover the pan and allow it to cook together for 45
minutes. The aroma this emits as it’s simmering together is incredible; your
entire family will want to know “what’s that yummy smell?” Turn off the
flame and allow it to cool for 10 minutes before transferring this salad to
plastic container. Refrigerate until use. I enjoy this one just as it is,
chunky and hearty looking.

During the rest of the year, It goes great with the challahs, along with some
olive oil and also chummous to dip with it. It lasts at least a week, often
longer, in the fridge and can be frozen as well if you want to make it in
advance.