Expert challah tips and tricks. Join Challah Bytes today!

Tag Archives: food recipes

Almond-Apple Cake

A moist cake with only the goodness of apples used as sweetener. Great for Rosh Hashanah! Submitted by Toby Weinper of Hamodia Magazine

Makes 1 round cake, 16 pieces

Ingredients

3 eggs
1/4 cup oil
1 cup unsweetened applesauce
3/4 cup unsweetened apple juice concentrate (canned)
2 & 1/4 cups whole wheat flour
1 teaspoon baking soda
1 teaspoon each cinnamon and ginger (optional)
1 & 1/2 cups ground almonds
2 apples, peeledtill warm, stir in 1 and 1/2 cups

Method

Preheat the oven to 350°F / 180°C.

Grease and flour a 10-inch round baking pan. Beat the eggs until they are frothy and have expanded in volume. Continue beating and add the oil in a thin stream. Add applesauce and apple juice concentrate.

In a separate bowl or a plastic bag, combine flour, baking soda, spices if using and almonds. Add to the batter and beat until well -combined. Dice one of the apples and mix into batter. Pour the batter into the pan. Slice the second apple into slices and use it to decorate the top of the cake, by layering it on top

Bake the cake for about 40 minutes or until the cake tests done when pierced in its center. Let the cake cool on a rack for 15 minutes before turning it out of the pan.

Nutritional Information per piece: Calories 250, Protein 5g, Carbohydrates 37g ,Fat 9.7g, Saturated Fat 1g ,Sodium 62mg , Fiber 2.5

Blended Fruit Soup

A delightful summertime treat that I specifically save it for seudas shelishis (the third meal of Shabbos afternoon)

serves 8 to 10

My neighbor Esther shared this with me. It is a variation on an otherwise typical fruit soup, and it is such a delightful summertime treat that I specifically save it for seudas shelishis/ the third meal of Shabbos afternoon. It also is such a refreshing treat in the Succah. Here in Israel, Succos is still very warm in the daytime, unlike most of the East Coast of the US of A! My kids love it; they don’t see or taste any pieces and the color is very attractive. For those who DO like texture in a fruit soup, you can just puree it half way.

Ingredients

each of assorted overripe fruits, such as seedless grapes, plums, peaches,
nectarines, and apricots, or even a glass jar of red cherries
1/4 – 1/2 cup sugar (optional)
1 cup orange juice
2 tablespoons agave syrup (a natural chemical-free sweetener available in health-food stores)
** You can use 2-4 tablespoons of apple juice concentrate instead if you don’t have access to the agave syrup

Method

Wash all fruit. Slice and dice (if you are not pureeing all the way, be sure to cut each grape in half to prevent small children from choking G-d forbid) and place all fruit in a large pot. Fill the pot with water halfway up to the height of the fruit.

When the water boils, turn down the heat and simmer until fruit is completely cooked, about 40 minutes. Cool and add orange juice and agave syrup. Taste the liquid. If it is too tart for your taste, add sugar (but I never need to). (Or more agave if you want to keep the sugar out completely.)

Puree the fruit soup with a stick blender and chill thoroughly in a glass or plastic container, covered. Serve in small dessert bowls or pretty glasses and watch your family enjoy it to the last drop!

Crushed Peanut Cookies

These are NOT a peanut-butter cookie!

Makes about 50-60 cookies of the size shown in the photo.

Ingredients

4 eggs
1 cup oil
1¼ cups sugar
2 teaspoons vanilla
3 teaspoons baking powder
small pinch of salt
5½ cups flour (you may need a bit more if the dough is too sticky)
200 grams shelled, unsalted peanuts, with the brown skins on, ground
1 cup regular sized chocolate chips

Method

Yes, readers, I have used this basic cookie recipe before. but there are so many great things you can do without margarine, that I am using it again here. If you haven’t saved the recipe before, save it now!

Preheat oven to 350° F/180° C.

In your mixer, beat the eggs, oil, sugar, vanilla, baking powder and the tiny bit of salt. Mix well. Add in the flour gradually until you have a smooth cookie dough. Pluck off a small piece of dough and roll it on your palm. (If it sticks to your hands, add in a bit more flour, perhaps 2 more tablespoons, until the dough is smooth, but this dough is almost always smooth as is.)

Process peanuts with the sharp metal “S” blade only until they are small bits, but not a powder. Set aside.

To shape cookies, pull off small bits of dough and roll them into balls. The cookies look nicest when they are miniature sized as shown. Larger sized cookies mean fewer per batch and they are less attractive. Flatten slightly with your thumb. Roll the cookies in the crushed peanuts, then lay them out on parchment-paper-lined cookie trays. Bake two trays at a time in preheated oven for 8-9 minutes until very slightly browned. Remove immediately from oven. Before they cool down, quickly take three chocolate chips and press them down into each cookie’s center. If you wait even a few minutes, the chocolate chips won’t go into the cookies and they won’t “stick.” Repeat this process until you have used all your cookie dough and the necessary amount of chocolate chips.

As the cookies cool, transfer the first 2 trays of cookies onto shallow pans or trays and slide them uncovered into the freezer to set while you do the next 2 trays. By the time the next two trays are out of the oven and chocolate chips inserted, the first 2 trays will have hardened in your freezer. Now you can remove them safely to plastic bags for freezing, without squashing the soft and warm chocolate chip center in the process.

Sprinkle Cookie Sticks

Makes about 70 small sticks

Ingredients

4 eggs
1 cup oil
1 1/4 cup sugar
1 teaspoon vanilla
3 teaspoons baking powder
pinch of salt
5 1/2 cups flour (you may need a bit more if the dough is too sticky)

Method

Preheat the oven to 350° F/180° C.

In your mixer, beat together eggs, oil, sugar, vanilla, baking powder and the tiny bit of salt. Mix well. Add in the flour gradually until you have a smooth cookie dough. Pluck off a small piece of dough and roll it on your palm. If it sticks to your hands, add in a bit more flour, perhaps 2 more tablespoons, until the dough is smooth. This dough is almost always smooth just the way it is and you don’t need to add more flour.

Now start shaping cookies. Pull off pieces of dough and gently roll each piece into a thin log with your hands. Cut the logs into equal lengths so that your finished cookies will look the same. If you make the pieces too thick or too long, you will wind up with fewer cookies and they will not be attractive.

Line the sticks up on your baking paper-lined tray. You should be able to place a lot of cookie sticks on the tray at once because although they do puff up, it’s not by much.

Slide the trays into the preheated oven and bake the cookies until they are slightly browned, about 10- minutes, sometimes even less than 10 minutes. (Overbaking will net you a too-crunchy, not-as-tasty cookie, so time it right.) Remove the trays in turn and allow the cookies to cool.

Now you can decorate them. Another time saver that I do is when I’m pressed for time and can’t bake and decorate on the same day, I first bake all the cookies and then freeze them away. Then, a different day when I can sit still for an hour, that is when I will take them out to do the next step. In fact, the decorating can even be done while they are still frozen, so there’ no waiting time involved.

Melt some plain, semi-sweet pareve chocolate in a bowl via your microwave or in a double-boiler. Pour some sprinkles into a small bowl and have it nearby. Layer a tray with baking parchment and now you are ready to begin.

Dip the end of each cookie stick into the melted chocolate. Let the chocolate drip off a bit, but while it is still wet, roll it quickly into the sprinkles so that the sprinkles stick to the chocolate. Lay each finished cookie down on the clean baking parchment to dry and continue with the next cookie until all are done. Freeze on the tray until the chocolate has hardened. Now you can place them in freezer bags or Ziplocs until you need them.

Leftover Chicken- Not Again!

I have several little packages of leftover chicken pieces from various different chicken meals all over my freezer. I am loathe to throw them out, yet I don’t like them cluttering up my freezer. But if I attempt to seve them, my kids will cry “Ugh, Mommy, not those leftovers again!” And then I will have warned them up for nothing. Any ideas what to do with it all?

Yes, I do have ideas about how to deal with such a situation. It is representative of a general problem many of us face: we don’t want to waste food and keep spending money on more when there is perfectly good food somewhere in the freezer, but we don’t know how to use it in a way that will entice our families to eat it.

Here are two ideas I’ve tried when I had enough leftovers to combine, and they went over really well with my entire family. In addition, it made me feel so good to know that the food not only got used up (finally!), but more importantly, it did not go to waste. And the added benefit was all that extra freed-up freezer space!

Idea 1: Chicken Potato Pie

These instructions are sufficient for a 9×13 roasting pan:
Boil about 10 medium-sized potatoes. When they are soft, drain and mash them, adding some oil, salt and pepper to taste. Spray the bottom of the pan, and spread half the potato mixture into it. Set aside.

Preheat the oven to 350°F / 180°C before going on to the next step.

Take all the chicken off the various bones you have amassed. Cut up these chicken pieces into smaller pieces; they should measure about 4–5 cups of diced chicken pieces. If you want to get fancy, dice one onion and sauté it in a bit of oil. Add the chicken pieces, and some leftover chicken sauce to the pan with the onions. Stir it all together over a small flame until it is a bit bubbly. Turn off the flame.

Spread this chicken mixture over your mashed potatoes in the pan. If you like your “pie” with more “filling,” remember to add more chicken pieces to it the next time you do this. Top the chicken layer with the rest of the mashed potatoes.

You can make the chicken pie look nicer by creating lines on the top of it with the tines of a fork. Sprinkle paprika over the top and spray it with a bit more oil. Slide the pan into the hot oven and bake for 25–30 minutes.

While this bakes, set your table, cut a fresh salad or a fresh vegetable platter and put that out first. Create some mushroom sauce for the pie. Then serve the pie and spoon some sauce over each person’s portion. You won’t have any leftover chicken pieces from this one!

Idea 2: Chicken Patties

My daughter did this for us and they came out fantastic. They make a great fleishig lunch-onthe-go, or a nice dinner, coupled with a salad or even served on buns with lettuce, and slices of onion and tomato.

Cut up the chicken pieces into small pieces. This ratio works for approximately 4 cups of chicken pieces: Add 4 eggs, 1 cup of breadcrumbs, a dash of pepper, ½ teaspoon salt, 2 tablespoons mustard, and 2 tablespoons ketchup. Mix this together; it should be a thick, wet mixture by now.

Preheat the oven to 350°F / 180°C. Cover a baking tray with oil spray. Form small patties out of this mix and lay them down
on the tray. Don’t flatten them too much, as they are nicer and tastier when they have a bit of body to them. When the tray is full (you can place them one next to the other as they are not going to rise at all), spray them lightly on top and bake them for 15 minutes. Remove from the oven and serve with rice or burger rolls and fresh vegetables. If handy, offer vegetable soup.

Enjoy using your leftover chicken in creative ways! If you have more original recipes or uses for your leftover chicken, I would love to hear from you.

Soft Fruit- What to Do with It All?

This is part 2 of a two-part series. Find part 1 here.

I bought such beautiful fruits, but a good portion of them became too soft to enjoy before we could finish eating them. I am loathe to throw them out; however, there is not enough for me to make a fruit soup out of them. Any ideas about what else I can do with it all?

Another idea I find works very well for soft puréed fruit is to simply make healthful muffins out of them. Here’s a muffin
ratio I use all the time, and whatever choice of fruits I use to bake these with, they’re always appreciated:

Fruity Whole-Wheat Muffins

Ingredients

3 eggs
1 ½ cups light brown sugar
3 cups light whole-wheat flour
1 cup oil
1 ½ teaspoons baking powder
1 ½ teaspoons baking soda
¾ cup orange juice
1 teaspoon vanilla
2 cups puréed fruit

Method

Beat the eggs in your mixer, no need to separate them. Add in everything else in the order listed, except the fruit. You should have a nice thick batter that is still pourable.

Pour in the puréed fruit and swirl it in by hand with a spatula. Line a muffin tray with paper muffin cups, and fill each one with batter until nearly the top. If you like, you can sprinkle some cinnamon and sugar on top of each one. Bake for 18–20 minutes until they test done. Remove from the oven immediately. These freeze well, and they make a very nice, easy lunch, together with some fresh vegetables and cottage cheese.

The muffins also make a great, nutritious lunchbox treat, just in time for the back-to-school season!

Mandarin Orange Beet Salad

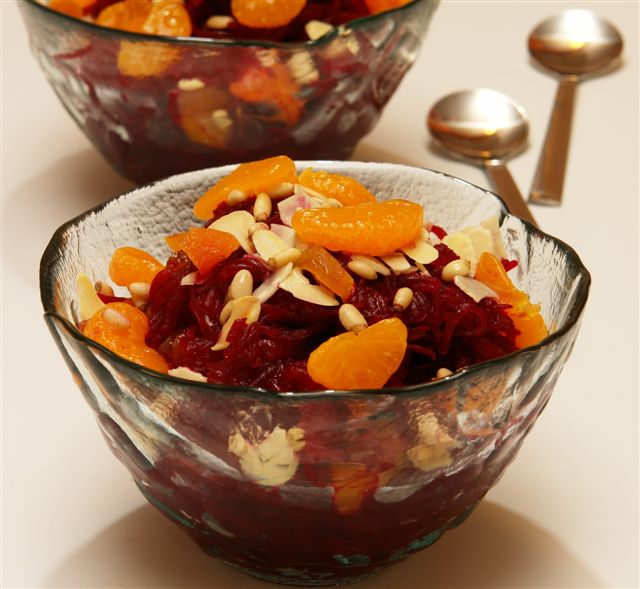
Beets keep well for longer periods of time, are full of healthy vitamins, and have so many varied uses. Instead of just average borscht or chrein, why not try something new this year?

47_beet_and_manorange
image-1518

Tip

You can freeze cooked beets and when they are defrosted, they are just as good as the day they were cooked. This is a GREAT time saver. I buy a lot of beets at one time, and then peel, check and boil them all on the same day. After they are cooled, since they shred and/or chop nicest when they are cold, I cut/shred/slice them into whatever form I want to store away. Then I pack them into disposable plastic containers, label what they will be for, and freeze them. This saves tons of time during the holiday, and also saves me some valuable fridge space. Plus, I do not have to worry about the beets going bad in the fridge, nor wilting or going moldy in storage before they are even cooked.

I really enjoy this particular salad, and surprisingly, so do my kids. If you need to cut down on sugar intake, you can cut the sugar here to 2 Tablespoons and still maintain its flavor from just the fruits in the salad. The taste is outstanding, and the presentation is so pretty with the vivid splash of colors against each other…

Mandarin Orange Beet Salad

This ratio makes enough for 4 people

Ingredients

2- 2 1/2 cups cooked and shredded beets, which is about 3 medium sized beets
1/4 cup sugar
1/4 tsp. salt
1 tsp. fresh lemon juice or vinegar
1/4 cup juice from what the beets were cooked in; (or just use the mandarin orange juice below, if you threw out the beet juices by accident)
1/4 cup almond slices
6 dried apricots, diced
1/3 cup white raisins, optional
1 can mandarin orange pieces, juice included
1/4 -1/2 cup pine nuts for garnishing, optional (this depends if you can find it in your area with a Pesachdik hechsher)

Method

Mix together the beets, sugar, salt, and juice and water. Refrigerate until serving. Right before serving, add in almond slices, diced apricots, and white raisins, tossing just a bit. Decorate with the mandarin orange slices arranged nicely on top, along with the pine nuts and serve.

Tangy Cranberry Meatballs

This great recipe is based on my regular meatball recipe with cranberry sauce and a bit of wine added. The flavor is unique and makes this a Yom Tov specialty! You can make the meatballs any size you like; I think it looks (and stretches) best when the meatballs are tiny, but if you’re short on time, you needn’t worry about their size.

Serves 6

Ingredients

1/2 kilo (1 pound) ground beef
1/2 kilo (1 pound) ground turkey or chicken
1 onion, pureed with 2 gloves garlic
2 eggs
1/2 cup kasha or quinoa or bulgur or breadcrumbs *
1 additional large onion, chopped
2 tablespoons oil

Method

*If you use kasha, quinoa or bulgur, soak the grains first in ¾ cup very hot water for 15 minutes to soften before adding to meat mixture. Breadcrumbs do not need to be soaked.

Mix together the ground beef, ground chicken, and pureed onion and garlic. Add in eggs and 1/2 cup of softened grain. Mix and if you are not making the meatballs right away, cover the bowl and let it chill in the fridge.

Using a large frying pan, sauté the additional chopped onion in the 2 tablespoons of oil on a low flame and while it is sautéing, form meatballs and add to the slowly sautéing onion. Let them brown for about five minutes, turning once to brown on the other side, then remove them to a plate. Keep forming meatballs and browning them until you have finished all the meat mixture.

Prepare sauce in a deep pot:

Sauce

1 can smooth cranberry sauce without berries

1 cup ketchup

1/4 cup semidry white wine

1 tablespoon soy sauce (optional)

1 tablespoon lemon juice

1 tablespoon dark brown sugar

½ teaspoon pepper

Stir sauce ingredients together to smooth out any lumps and simmer on low. Add the meatballs, and simmer for one hour. This recipe does freeze well. Serve over a bed of brown rice, cooked quinoa or cooked and fluffed bulgur.

Stewed Red Cabbage & Raisin Salad

Good as a Rosh Hashana side dish…

Serves 6 -8

Ingredients

1 large head red cabbage, shredded
1/2 head of a small green cabbage, shredded
1/4 cup water
2 large onions, diced
2 large green apples, chopped
2 Tablespoons oil
1/2 cup dark raisins
1 Tablespoon dark brown sugar
1 Tablespoon lemon juice *

Method

*Note: Rosh Hashana time many people follow the minhag/custom not to eat sharp or tart foods. I left this in the recipe anyhow as it adds to its flavor but is not readily discernible and the recipe is still sweet.

Put the shredded cabbages into a pot, add the 1/4 cup water and bring it to a boil. Let it cook for 15 minutes and then turn it off. Remove it from the heat and drain it in a colander. The cabbage may turn sort of purple or blue.

Saute the onions in the oil for 5-8 minutes. Add in the apples during the last 3 minutes and toss to ensure that they will not burn. Add the cabbage back into the pot, together with the raisins, sugar and lemon juice. Mix it well, Cover the pot and let it simmer on a low heat for 30 minutes. Serves well hot or cold.

Applesauce Cranberry Ices

So refreshing at the end of a seuda…

Ingredients

1 ½ – 2 cups applesauce
2 cans cranberry sauce (the one without the whole berries)
1 cup Sprite soda
1 cup orange juice
Optional (I did not use it): 1-2 Tablespoons fruit flavored liqueur

Method

Mix this up by hand in a bowl, or beat it with a hand beater for a minute or two to make it smooth. Pour it into a flat large plastic square container and freeze overnight. (Right, this took you about 4.5 minutes so far? Now comes the next 5 minutes or so!) The next day, remove it from the freezer. Cut into it; if you can, then cut it into four or five pieces and put it into your mixer bowl. Beat it slowly with the flat metal hook (ie, NOT the egg beaters!) until it resembles sherbet consistency. Refreeze. Remove from the freezer about 5 minutes before serving. Scoop into dessert bowls and serve.