Expert challah tips and tricks. Join Challah Bytes today!

Tag Archives: shabbos recipes

Butternut Squash Kugel

butternut squash kugel
image-1996
Serves approx. 8
Makes one 8×11-inch tray OR 1 medium sized loaf pan

Ingredients

2½ cups (20 oz) cooked and mashed butternut squash (about 2 medium squashes)
5/8 cup potato starch
½ cup oil
½ cup sugar
3 eggs
2 tsp. cinnamon

Method

Cut the butternut squash in half lengthwise. Place the pieces in a large pot with about 2 inches of water, and cover the pot. Bring to a boil and cook them for 30 minutes, until the squash is fork tender. Remove the squash from the pot and let it cool. Scoop out the meat from the skin, discarding the skins. Mash the squash meat and measure out the amount needed.

Tip: Any extra squash can easily be frozen and used later in a vegetable soup.

Preheat the oven to 350°F / 180°C.

Sift the potato starch over the mashed squash with a small sifter or tea strainer. (This prevents lumps.) Add in the oil, sugar, and eggs. Mix together, by hand, very well until the batter is smooth.

Line an 8×11-inch baking pan or two medium sized loaf pans with baking paper OR spray them with baking spray. Pour the batter into the pan(s). Sprinkle the cinnamon over the top of the kugel. Bake for 40–45 minutes, until the center of the kugel tests firm when pierced with a knife. The center of the kugel, even when firm, should still be a bit moist. Be careful not to overbake the kugel. When it is done, it also cracks slightly on top.

Tip: This kugel slices neatest when it is cold. Make it one day in advance. The next day, slice it into neat squares and then it can be served cold or warmed up again, covered, for 10 minutes before serving.

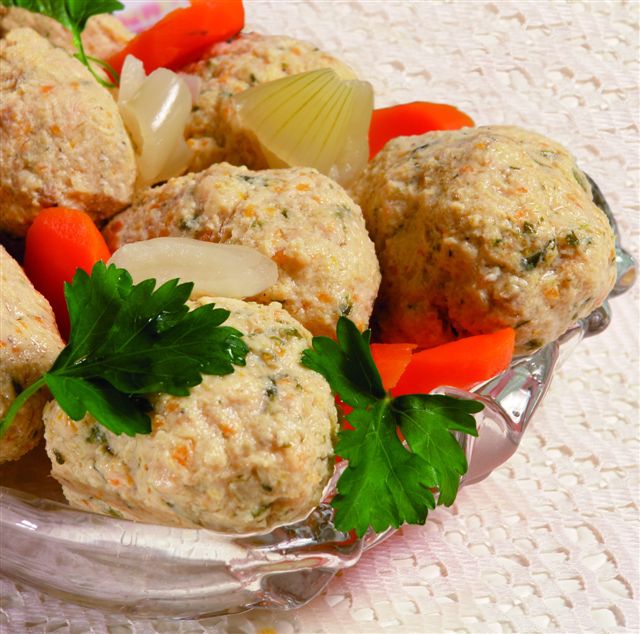
Salmon Gefilte Fish

This recipe has a story…

45_salmon_gefilte_fish
image-1988
I made up this recipe one year when, Erev Pesach, the fish store near me had a sale on salmon, the only catch being that one had to buy the whole fish. Since my parents were coming to me and they enjoy fresh salmon, I ordered it. The only problem was that I would then have to take also the end parts, closest to the tail side of the fish, and no one in my family likes to eat those pieces. So I hit on a brilliant idea. I asked the store to prepare those end pieces for me like ground carp, so that I could do something else with it. When the fish came to the house, all pink and fresh looking, I couldn’t resist trying something newer with it. I followed the basic rules for gefilte fish but changed several things about it – and the results were fantastic! Even though it was literally only one day to Seder night, I sat down and typed this up so that I wouldn’t forget by the time Pesach was over, what I had done to this “made up recipe”…

Serves 8–10

Ingredients

1½ medium onions
6–8 cloves fresh garlic, optional
2 medium carrots
3 scallions
A very small bunch of fresh parsley
5 eggs
1 tsp. pepper
1 T. salt
¼ cup sugar
2¼ lbs / 1 kilo fresh salmon, ground

Broth ingredients:
1 onion
1 carrot, chopped
1/4 cup sugar
2 tsp. salt

Method

In a food processor fitted with the sharp “S” blade, grind together the onions, garlic, carrots, scallion, parsley, and dill. Add in the eggs, pepper, salt, and sugar and continue to blend it all together until it is completely pureed.

Place the raw ground salmon in a large mixing bowl and pour the pureed vegetable mixture in with it. Beat it all together using an electric hand mixer for 10 minutes, until it turns lighter in color and thicker in texture. Refrigerate this “fish mish” for a few hours or overnight.

Fill a large pot half-way with water and add the onion, carrot, sugar, and salt. Bring this to a boil.

With wet hands, form small patties or balls out of the fish mixture and drop them into the rapidly boiling water, one at a time. Cover the pot and after it has reached the boiling point, reduce the flame to low. Allow the fish to cook for 75–90 minutes. Remove the fish balls together with some of the broth to a flat, wide plastic container and refrigerate until use. Delicious, fluffy and truly a Yom Tov treat!

Serve with chrein and homemade mayonnaise as usual!!

Yeast Questions and Information

What is the difference is between fresh and dry yeast?
Do certain recipes require one particular kind or are they used indiscriminately?
What is the exact conversion from dry yeast to live yeast and vice versa?

There is a scientific difference between fresh and dry yeast. However, I do not have all the information on that. For me, it matters very little since the differences I have interest in is how they work, what the amounts are when you want to substitute one for the other, and why one would prefer one over the other.

There are definite differences when you use fresh or dry yeast. For one thing, many people do not know how to effectively store and use dry yeast so when you want to ensure that your yeast is really, really fresh, they will be told to buy only fresh yeast! Both yeasts have active cultures in them, but you use them slightly differently.

Fresh yeast is something I personally prefer for challahs simply because it works so well and when it’s very fresh, it tastes very nice. A typical challah recipe of 5 lbs. / 2.4 – 2.5 kilos of flour will call for 2.5 – 3 ounces of fresh yeast, depending on who is giving you the recipe. Two ounces of fresh yeast is the basic equivalent of 50 grams (plus a tiny bit more if you want to be very exact), of a fresh yeast cube OR 2 flat tablespoons of dry yeast. Every tablespoon of dry yeast is like 1 ounce of fresh yeast. If you look it up on charts, a scientific chart can give you exact grams and milligrams, but for the purposes of this article, these are the measurements I have been using for years and it always works.

Fresh yeast needs to be activated before being used by placing it in a small pareve bowl with very hot but not boiling water and a bit of sugar. You cover the bowl loosely and wait about 10 minutes. It should foam and bubble. Then you add this mixture to your challah dough in-the-making, and knead it all together.

Dry yeast can be just added into the dough mixture as you are preparing it without bubbling it up.

However, many, many people misuse dry yeast. Although the larger vacuum packs will tell you that you can store it after opening in a closet or in the fridge, if you do so it will not be as fresh or as active after just a few days. If you really want your dry yeast to work just as well as the day you opened it, it is crucial that you pour it out into a good plastic container with a strong lid and store it in the freezer for long term use. This way, every time you need it, you simply remove it from the freezer, twist it open, (I use large peanut butter plastic jars that I have saved and washed out, they work great for something like this!) and measure out the amount of tablespoons that you need for your dough. Presto – it will work great every time.

I don’t know all the reasons that some people prefer one type of yeast over others for different recipes. I just know for myself that I use fresh or dry yeast for challahs all the time, both work great. For ruggelach and yeast doughs I do prefer fresh yeast only and this is probably mostly because my mother and grandmother both did it this way. For flat breads, whole wheat loaves, and many other types of breads I often use dry yeast and it works very well.

Hoping that all your challahs come out excellent!

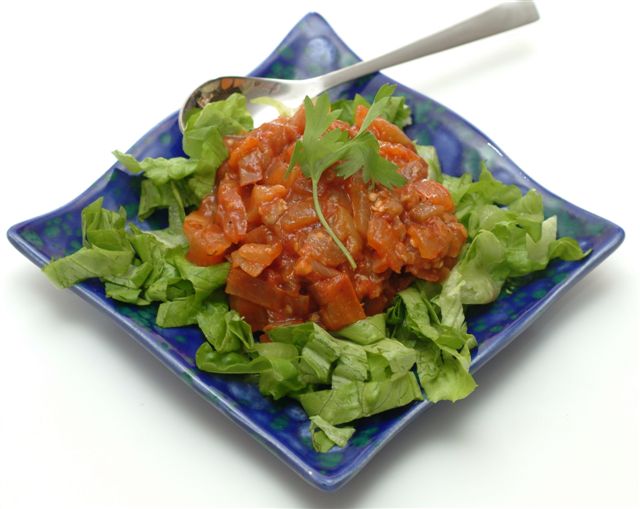
Tangy Eggplant Salad

Such a good recipe, you will use it all year through…as I do!
Serves 6

tangy eggplant salad
image-1289

Ingredients

2 medium onions, diced
3 cloves garlic, diced
1 green pepper, diced
1 large eggplant or 2 small ones, peeled and diced
1/4 cup olive oil
1 & 1/2 tsp. salt
1/4 tsp. pepper
1/2 tsp. oregano
3 T. vinegar
2 T. sugar
3/4 cup tomato sauce

Method

In a large, flat pan that has a lid, add in the onions and garlic, and the
olive oil and start to sautee until it starts to turn a clear, golden color,
about 10 minutes. Add the diced green pepper and cook it another 5 minutes,
stirring occasionally. Add in the diced eggplant and let it cook for another
10 minutes. Add in all the seasonings and the rest of the ingredients. Turn
the flame down to simmer, cover the pan and allow it to cook together for 45
minutes. The aroma this emits as it’s simmering together is incredible; your
entire family will want to know “what’s that yummy smell?” Turn off the
flame and allow it to cool for 10 minutes before transferring this salad to
plastic container. Refrigerate until use. I enjoy this one just as it is,
chunky and hearty looking.

During the rest of the year, It goes great with the challahs, along with some
olive oil and also chummous to dip with it. It lasts at least a week, often
longer, in the fridge and can be frozen as well if you want to make it in
advance.

Mini Carrot Muffins

Yield: about 50 mini- muffins
Or, if you want the easier way out, make it as a 9×3 “kugel” and cut it into squares…

Ingredients

4 eggs
1 cup canola oil
1 cup dark brown sugar
1/3 cup hot water
3 cups flour, whole wheat, white, or a combo **
1 & ½ tsp. baking soda
3 tsp. baking powder
1 tsp. cinnamon
3 – 4 large carrots, peeled

** if you use only white flour, it will come out light and fluffy. I’ve made it many times using whole wheat, a version that is very finely ground, and it comes out excellent that way as well. Plus, any leftovers, IF you have any, come in handy as a great healthy snack on the way to school for any kids in your house…

Method

Grate the carrots through a food processor. Set aside.

Preheat the oven to 350°F / 180°C.

Place the ingredients in the mixer bowl in the order listed. Mix until you have a thick and smooth batter. Add in the grated carrots and mix again until just incorporated.

Line the muffin tray with paper liners or spray the tray well with baking spray. Fill the muffin cups until almost full. Bake for 8-12 minutes until they are golden brown or a cake tester or sharp knife inserted into a muffin’s center tests clean. If you took ‘the easy way out’, and made it into a flat “kugel” (a.k.a. religious word for cake!), then bake it for 30-35 minutes, until the ‘kugel’s’ center tests clean. Remove from tray promptly and allow to cool. These freeze great. I know – they even eat great straight from the freezer with only a few minutes of defrost time…!!

Simple, delicious and a sure hit Friday nights

Savory Aromatic Chicken

Serves 5-6

Ingredients

1 large chicken, cut into serving pieces for at least 5-6 people
2 medium sized sweet potatoes, cut into 5 circles each
2 potatoes, cut into 5 circles each
1 tablespoon paprika
1/8 teaspoon paprika charifa, hot red pepper, optional
1 teaspoon cumin
1/2 teaspoon turmeric
1 tablespoon garlic powder
1 tablespoon onion powder
1 teaspoon dried mustard powder
1/8 teaspoon pepper
2 teaspoons parsley flakes
2 teaspoons dried garlic chips OR 3 cloves garlic, diced
2-3 tablespoons olive oil
1 large onion, sliced

Method

I enjoy being able to roast/cook the chicken very close to when Shabbos comes in; however, I don’t want to be late to candle lighting nor do I want to be rushing around with chicken still to do at the last minute. This can be prepared early Friday morning, lined up in the pan ready to go and covered until you are ready to bake it. It makes for such an easy way to have very freshly cooked chicken, minus rush and hassle.

Clean and prepare all your chicken pieces, cut to your favorite sizes. I like to separate all the legs and thighs, as well as the other parts. Do not take off the skin. Remove excess fat.

Take out a large flat roasting pan. Spray the bottom of it with baking spray. Layer in the sliced sweet potatoes and the sliced potatoes. Layer the chicken pieces upside down all over the top and in between the sliced potatoes.

Put all the spices, including the dried garlic pieces, into a small bowl and mix it together with a spoon.

Take about 1/3 of the spices in your bowl and, using your spoon, generously sprinkle it all over the upside down pieces of chicken. Flip every chicken piece over so that it is right side up again. Lift up the skin on every piece but do not remove the skins. Sprinkle the remaining spices all over the chicken pieces, ensuring that every piece has a generous amount on it. Pull the skins back down.

Take your regular paprika shaker and shake a bit more paprika all over the chicken skins to make it look nice. If you have any spice mix remaining, use that too. Drizzle the olive oil over the top of everything. Add on the onion slices to the top of the chicken.

Cover the chicken with baking paper and then with foil (so the foil won’t be touching your food directly). Slide it into the fridge until you are ready to bake it.

Preheat the oven to 375°F/ 195-200°C for 15 minutes. Slide the prepared chicken tray into the oven and bake for 70 minutes, NOT LONGER. Turn off the oven immediately. You can now leave it in your oven until you eat it Friday night if you did this within the last 2 hours before Shabbos. If you want to cook it earlier, bake for 65 minutes; when re-warming it, do so for another 15-20 minutes to ensure it heats up properly and cooks a bit more.

Serve on a platter with chicken pieces on one side and the veggies on the other. This serves very nicely alongside any kind of rice.