Expert challah tips and tricks. Join Challah Bytes today!

Tag Archives: challah tips

Here’s a common query I get from many of you out there and this time, instead of only responding to the person writing to me, I would like to share it with all of you.

The answer to this dough and rising issue is one that I know so many challah bakers need to know:

Hi Tamar,
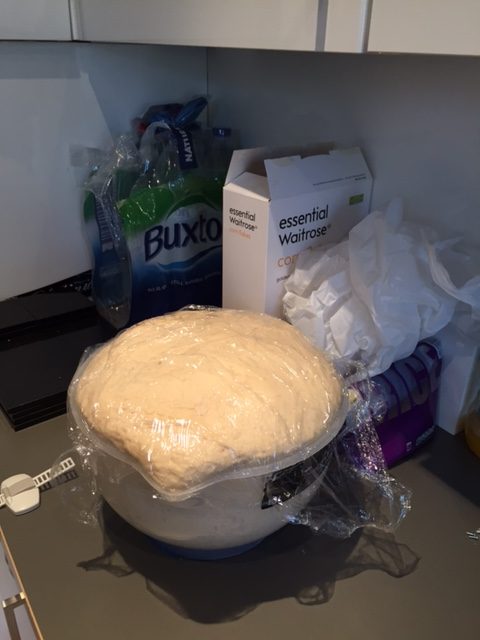
I make challot because both my kids (ages 3 and 1) are allergic to egg and the shop bought ones usually have egg in them. My recipe uses fresh yeast, and then all the usual ingredients except eggs.

I made some today, left the dough to rise for a little over 3 hours as I had to go out and it rose beautifully (see photo) and was very airy.
image001
I knocked it back, shaped the loaves, and left them to rise again for about an hour.

This is when the problem occurs. After they have been baked they never rise more than about an inch. They expand outwards but not upwards. I am sure there isn’t a problem with the yeast as the dough always rises brilliantly when left before shaping but just doesn’t rise again after shaping and I don’t know what I’m doing wrong. I’d really appreciate any advice you can give.
Good Shabbos,
LC

Answer from Tamar Ansh:

Hi and thanks for writing in! Your problem is not really that uncommon – it happens to lots of people. Here’s what I think is most likely the issue.

Your dough is a bit too loose, and too wet. While this will yes net you airier challahs and those that rise a lot, you need to put a bit more flour into your dough so it will hold its shape after rising. I suggest adding in another half cup to a full cup of flour to your dough when you are preparing it.
DSCF6807measuringcup&flour
If this makes the dough too tough, add in a bit more liquid again although not too much and also a bit more oil. Your final dough should be smooth and elastic feeling without being too sticky and too soft.

doughkneadcrop0339
Try this tip and let me know if it works for you. This way, when you go to shape (re: braid, plait) your challah it will hold it’s shape better. It should also be easier to shape without sticking to your hands or work surface, and it will also rise upwards as well as outwards, thereby giving you a higher challah.

DSCF0266
Another solution that I know helps a lot of people is to use a “challah pan”, which is an oval shaped pan that comes in many different sizes to accommodate small to very large challahs. This way your challah cannot spread out, it is forced to rise upwards. (I do sell these pans in Jerusalem, not for overseas shipping though, if anyone is interested.)

Have a great Shabbos and happy challah baking.

A reader named Esther sent in her favorite of Tamar’s challah tips:

I have been baking challahs for more years than I can remember and have tried all sorts of tips light and fluffy.

I have tried:

  • Soda water
  • Punching down the dough in the middle of rising
  • Using “meshaper”
  • And many more

The winner is:

Tamar’s recommendation to knead for 10 minutes, then rest the dough, then knead again for 4 more minutes in order to fully activate the yeast.

My challahs and rolls are rising considerably more than they used to and are consequently lighter too. This
also means an increased yield per kilo. Thank you!


Esther
Jerusalem

Ideal Challah Baking Temperature

The best baking temperature for *most* challahs is about 190°C / 365-375°F.

Ideal Challah Baking Times

All times are approximate.

Small rolls: 12-15 minutes.
Medium sized challahs: 30-35 minutes.
Very large challahs vary depending on their exact weight. The average baking time for a challah made with 900 grams – 1 kilo (about 2 lbs.) of raw dough before being baked will take around 40- 43 minutes to bake through.

My challah crumbles when we cut it. I don’t know why. This is what I do. I never had any issues with it till now but I changed a few things. I started to use distilled water and self rising flour, maybe one of these is the problem. Not sure. But the challah is so sticky that I add a little more flour. I tried adding oil but it still is sticky so I can’t roll it very well. What should I do?

Tamar’s answer:

It’s hard for me to “diagnose” a challah problem without knowing the entire recipe you are following. However… in absence of knowing exactly what else was in your recipe, I’ll take an educated guess.

Rising agents

You should NOT use “self rising flour” for any challah recipe. The reason those flours “self rise” is because they are laced with tons of either baking soda, baking powder or both. Baking powders are one kind of a rising agent, and yeast is a totally different one.

Self-rising flour is meant for simple cakes where people don’t add baking powder to the recipe and instead use this flour. I bake tons and tons all the time and all I can say is that I have never once in my life ever used such flour. I’m nearly certain that is the problem.

If the flour has all that baking powder in it and then on top of that you have the yeast of the challah recipe, the challah is sure to dry out while it is baking. It can’t be a cake and also a bread at the same time .

Let’s bake it again

Try using ordinary flour that you sift first before starting to make it into a dough. Follow the instructions for any of the recipes in A Taste of Challah. I’m pretty sure your challahs will then come out as you are expecting them to – soft and delicious!

IF, for some reason , this does not solve your problem, please write me again and we’ll try once more to help you! Either way I’d love to know if my answers help you.

Happy baking!

One of the most frequent questions I receive is about freezing challah dough.

Can I freeze challah dough?
How do I freeze challah dough?

People all over the world freeze their challah dough.

However, I have found that the dough does not bake the same way once it has been frozen as dough, so I prefer not to freeze unbaked challahs.

Here is what I do instead.

1 I bake the whole batch.
2 Then freeze them baked.

Fresh challah, no mess

If my challahs are all baked and lined up in the freezer already, all I have to do on a week when I don’t have time to bake, is to remove the challahs from the freezer a few hours before Shabbos and poof – fresh challah, no mess.

Warming up the (formerly) frozen challah

If you want the defrosted challahs to be warm:

1 Wrap them in foil.
2 Warm up your oven shortly before Shabbos
3 Turn off the oven and then place the wrapped challahs in your warmed up oven shortly before Shabbos begins.
4 Remove them before Kiddush and place them on the table.

If you really want to freeze the unbaked dough

I know lots and lots of my readers enjoy having the smell of the freshly baked loaf in their homes and for this reason they do want to freeze unbaked challahs. And sometimes people only own small freezers and therefore do not have room to store risen and larger challahs – the frozen ones are smaller in size…

SO
If you do choose to freeze the unbaked challahs here’s what I’d do:

1 Make the dough
2 Do the hafrasha
3 Let the dough rise the first time for about an hour or so
4 Punch down and then shape.
Note: No need to let the shaped challahs rise if you are about to freeze them.

Freezing unbaked challahs

1 Line the baking tray with baking paper and place the shaped challahs upon them.
2 Freeze them uncovered.
3 When they are frozen solid, place them in good quality freezer bags and leave them in the freezer.

Prepping frozen dough for baking

The day you want to bake the frozen, shaped challah dough:

1 Take the frozen challah dough out of the bags.
2 Place them on the tray or in the pan you want to bake them in.
3 Let them sit there to defrost and then (hopefully) to rise.
4 When risen, brush with beaten eggs and bake as usual.

Happy baking!

Crunchy Challah Bottoms

Line your baking tray with parchment baking paper. To keep it from moving around, spray your tray lightly with a bit of water first and only then put on the paper. It will stay put that way without making your tray oily.

Sprinkle a wide line of sesame seeds directly onto one side of your tray. After you’ve finished braiding your challah, place it down directly onto the seeds and roll is slightly back and forth on them so the seeds will stick to the bottom of your challah. Then place the challah onto the tray to bake. Do this to both challahs (I’m assuming you are doing two challahs, or three at most per tray) and then cover them to rise as usual. Egg them and bake as directed. Enjoy your crunchy bottoms!

Sweet Challah Toppings

Sweet crumble topping

100 grams marg
1/2 cup white sugar
1 cup flour
1 tsp. cinnamon

Crumble it together until it’s, well, crumbs. If too mushy, add more sugar another 2 Tablespoons and a bit more flour.
Recrumble. If it is too dry, add a bit more margarine.

I try not to use margarine so I often substitute oil in these things. It works pretty well. For a once a year crumble, though, I probably would yes use the margarine this once.

Let the challahs rise, covered loosely with a plastic bag over its top for 30 minutes. Then wash with egg wash (one beaten egg in a cup) sprinkle on your crumbs and bake for 25-35 minutes until done.

Cinnamon sugar topping

Sprinkle the top of the challahs, after they are brushed with egg wash, with a cinnamon/sugar mix. This is really delicious!

How Long Should Challah Dough Rise?

The ideal amount of time to let a dough rise is literally as it’s written, ‘when it doubles in bulk’. This is actually more accurate than saying “one hour” as one hour does not always work. If it is a warmer or hot time of year, the dough may double in size within 40 minutes. If it is a colder kitchen or a drafty one the dough may take closer to two hours or an hour and a half to really expand properly. This is vital to your challahs’ success. One of the (many) reasons that challah can stretch and crack when baking is that the dough was not given time to properly rise to begin with. During the rising process the gluten in the dough is working as well as the yeast; insufficient time alloted disrupts their baking qualities.
Overrising the first rise, which is when the dough is still just a dough, can occur. Usually if it overrose just a bit, say, for an hour extra in a cold kitchen, it doesnt really matter. You simply punch it back down and go on to the shaping. However, if the dough is left out for a long time, unrefrigerated, it can spoil, especially in the summertime. So if you will be gone for a while or you think you may not get to the shaping within 2 hours of making the dough, it is best to put the dough in a large strong garbage bag, remove the air, and knot it near the top of the bag so the dough has room to expand. Then leave it in your refrigerator where it will certainly still grow, just a bit slower, and when you are ready to shape, remove it an hour beforehand. This way it will not turn sour or rancid.
Here’s a good recipe that should hold its form and also come out really good:

(This one is going into my next bread book, please G-d, as I didnt put it into the first one…the first one has many other great recipes as well)

Simple and Quick Egg Challahs

Yields: 3 medium to large challahs, 4-5 small ones
9 cups flour, sifted
2 eggs
1/2 cup sugar
1 T. salt
1/4 cup oil
1 & 1/2 – 2 cups warm water
1 & 1/2 T. dry yeast

Put the dough together in the order specified, but only start with 1 cup of the warm water. Start to knead it (in your mixer with the dough hook if you have one, if not, by hand). As it turns into a dough, use your judegement; if it’s still too dry, add bits more water until the dough isa nice consistency. To get it to clear the sides of the bowl and be elastic and smooth, now add in bits more of oil, until it is a smooth, somewhat firm, slightly sticky dough. Let it rest 15 minutes, covered. Knead another 2-3 minutes. Turn it out into a greased bowl, turning once so that all sides are coated. cover with plastic and let it rise for one hour. Shape and let them rise 45 min – 55 min. Egg them, sprinkle with topping or seeds, slide them into your PREHEATED oven that is set at 350°F from 20 minutes PRIOR to baking time, and bake them until golden top and bottom.

What is the best way to freeze and defrost challah?

This is a great question. Before freezing, I recommend completely cooling the challah so that the hot, steamy bottom won’t freeze with accumulated moisture, which will make the underside of the bread soggy. When your challahs come out of the oven all hot and beautiful, immediately release them from their trays and lay them to cool on a wire rack. You can even use an extra rack from your oven — just lay it down on your countertop. This way, as the challah is cooling, it will cool on both the bottom and the top. When you leave challahs to cool in their pans, the bottoms of the challahs collect moisture from the heat within them and then the bottoms become soft and often somewhat mushy.

Once completely cooled, the loaves must be packaged as airtightly as possible. While many people wrap their challah in multiple layers of aluminum foil, I prefer plastic freezer bags. Foil is both bulky and expensive. Place your cooled challahs directly in heavy duty, large-size, thick freezer bags. Remove the air from the bag and seal the bag with tape before storing it in a good deep freezer. When well wrapped in airtight freezer bags and placed in a good freezer, challahs can last for two months or more, if necessary.

To defrost, remove your challahs from the freezer about five hours before they will be served and let’s them come to room temperature.

For those who like warm challah, simply lay the defrosted loaves on top of a hot pot of soup or chulent. Or, heat up your oven for 20 minutes, turn it off, and place the challahs, wrapped in aluminum foil inside the oven until serving . Using aluminum foil in this step is important to prevent the bread’s crust from hardening or browning slightly.

Although I’ve been asked this many times, I personally do not recommend braiding and freezing uncooked challahs. To me, I think that challahs taste best when they rise and bake in the same day. I’d rather spend the time to bake them all and then freeze them finished, knowing they came out great and are all ready for use.

Enjo

How to Get Your Challahs to Bake More Evenly

Get the perfect consistency for your challah.
First step in doing this is to preheat the oven so that the temperature is even before you put your risen challahs inside. If you plan to put your challahs in after they have risen 40 minutes, then 20 minutes into your baking time you should turn the oven on to 375°F / 190°C.

Another way to achieve this is to use your turbo bake option, if you have this on your oven. It distributes the heat more evenly throughout the oven during the baking time, and in many cases, your challahs will be done baking earlier than they otherwise would have been, so check them to ensure they dont overbake. Challahs are done when they are golden brown (but not overly dark or blackened) on top and most importantly, on the bottom as well.

If your oven is not the best, you may need to remove the tray half way through the baking time, and do it the oldfashioned way — simply turn it around and put it back in again, facing the opposite direction!

Have a great time baking!